
Azure Application Service has a feature often referred as “Easy Auth” (see Authentication and authorization in Azure App Service and Azure Functions), which essentially consists of enabling user authentication for an application that does not support it.
Many users love this feature, since it allows enjoying enterprise-grade authentication without writing a single line of code, just by ticking a check box. So it is not surprising that many users ask how to do something similar in Kubernetes. There are probably different ways of doing this, but I am going to present you my favorite: using Ambassador.
Ambassador is an API Gateway for Kubernetes, as they put it in their web page. It offers functionality in a way similar to an ingress controller, but much more. One of the options it offers is offloading authentication to an Identity Provider such as Azure Active Directory, and that is what we are going to try here.
The first thing you need is a Kubernetes cluster, I am not going to show you here how to create one. I am going to use an AKS cluster for this with no special features. After that, you can install Ambassador using the instructions here. For example:
# Install Ambassador
sudo curl -fL https://metriton.datawire.io/downloads/linux/edgectl -o /usr/local/bin/edgectl && sudo chmod a+x /usr/local/bin/edgectl
edgectl install
This will deploy Ambassador in your cluster with the default settings. It will enable TLS and create a digital certificate using LetsEncrypt, as well as a public DNS for you. You can of course modify those with your own domain and certificates, but we will go with these defaults to make things simple. You should see something similar to this output:
========================================================================
Beginning Ambassador Edge Stack Installation
-> Finding repositories and chart versions
-> Installing Ambassador Edge Stack 1.7.1
-> Checking the AES pod deployment
-> Provisioning a cloud load balancer
-> Your Ambassador Edge Stack installation's address is 51.124.72.179
-> Checking that Ambassador Edge Stack is responding to ACME challenge
-> Automatically configuring TLS
-> Acquiring DNS name cranky-yalow-7215.edgestack.me
-> Obtaining a TLS certificate from Let's Encrypt
Still waiting for TLS certificate acquisition. (This may take a minute.)
-> TLS configured successfully

Ambassador Edge Stack Installation Complete!
========================================================================

Congratulations! You've successfully installed the Ambassador Edge Stack in
your Kubernetes cluster. You can find it at your custom URL:
https://cranky-yalow-7215.edgestack.me/
As you can see, the FQDN that Ambassador created for us is “cranky-yalow-7215.edgestack.me”. Now we need to deploy an application: I will use a test stack I often use in my labs that consists of a web frontend, an API and a database. For this test I will go without the database:
# Deploy sample app
ns_name=whoami
kubectl create ns $ns_name
kubectl -n $ns_name run sqlapi --image=erjosito/sqlapi:0.1 --replicas=1 --port=8080
kubectl -n $ns_name expose deploy/sqlapi --name=sqlapi --port=8080 --type=ClusterIP
kubectl -n $ns_name run sqlweb --image=erjosito/whoami:0.1 --replicas=1 --env="API_URL=http://sqlapi:8080" --port=80
kubectl -n $ns_name expose deploy/sqlweb --name=sqlweb --port=80 --type=ClusterIP
Ambassador has been deployed to the “ambassador” namespace, and our application is in the “whoami” namespace with ClusterIP services (no direct access from Internet). We will configure now Ambassador to provide access to the application from the outside world. In an ingress controller world you would configure an “ingress” rule, in Ambassador this is called a “mapping”:
# Deploy mapping for web svc
cat <<EOF | kubectl -n ambassador apply -f -
apiVersion: getambassador.io/v2
kind: Mapping
metadata:
  name: web
  namespace: ambassador
spec:
  prefix: /web/
  service: sqlweb.$ns_name
EOF
We could deploy another mapping for the API, but we will skip that. As you can see, the syntax for the service is “service_name.namespace” (intuitively I would have thought it should be the other way around, but anyway). We will map the URL path /web/ to the service. Now you should go and test your Ambassador FQDN or IP with the “/web/” path (so in my particular example https://cranky-yalow-7215.edgestack.me/web/, your FQDN will be different), and you should see something like this:
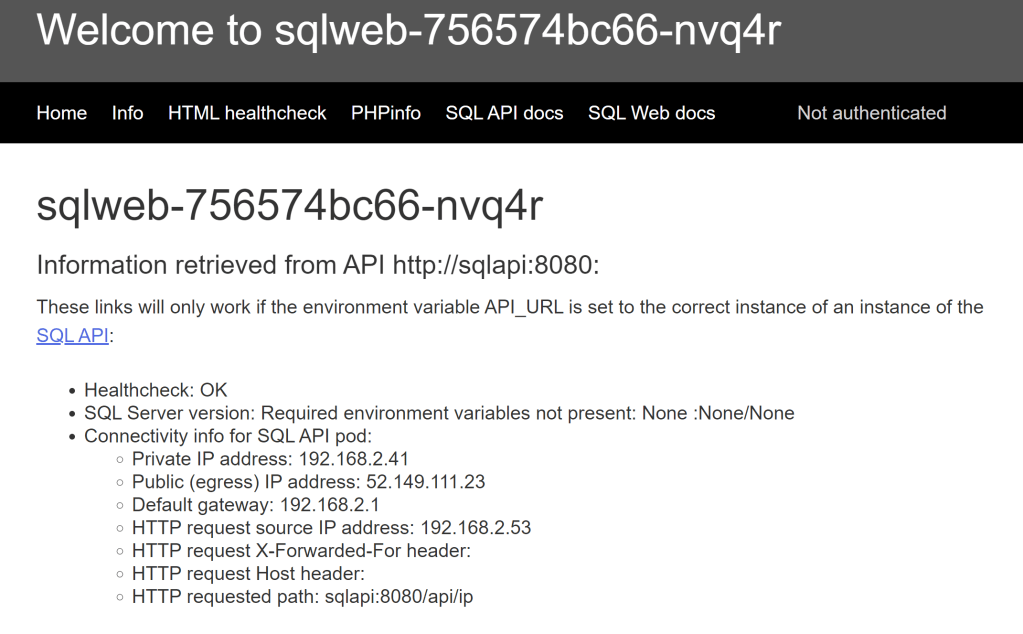
Note the “Not authenticated” message on the top right of the screen, you can safely ignore everything else in that page. That part of the app is looking for a Bearer Authentication HTTP header, and if it does not find one, it just shows that message. Now we need to instruct Ambassador to first authenticate users to Azure Active Directory before sending traffic to our service.
You need to define an AAD Application. There is not much to configure, the most important thing is the callback URL as described in the Ambassador AAD integration guide:
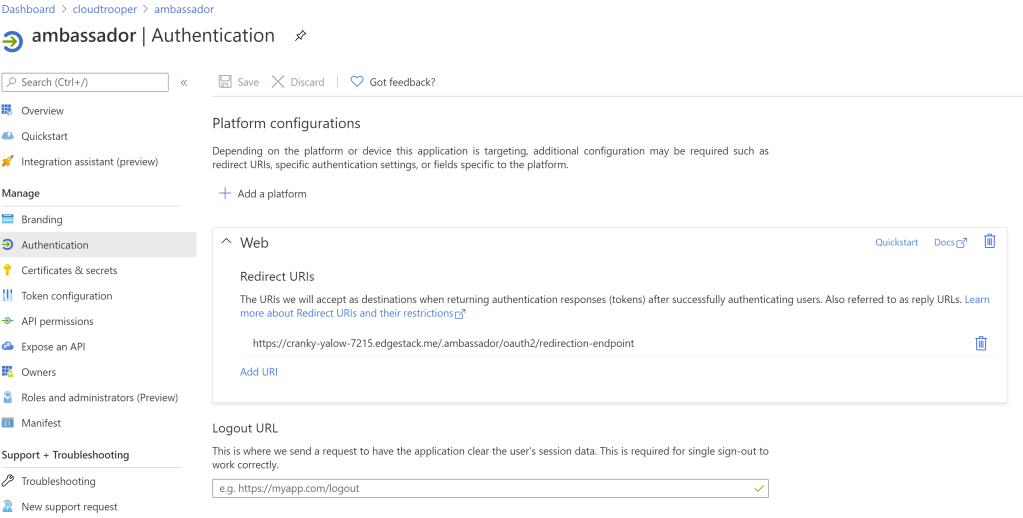
As you can see, it is Ambassador’s FQDN for HTTPS (AAD requires SSL) with the “.ambassador/oauth2/redirection-endpoint” path. You can change further configuration such as adding claims in the “Token configuration” section, or manually define which users and groups can authenticate, but we will go with the defaults. Now we need to teach Ambassador how to use our app, for which you will need three pieces of information:
- Application Client ID: you can find it in the Overview for the application
- Tenant ID: same thing, you will find it in the Overview
- Secret: you can define a secret in the “Certificates and secrets”
Armed with those variables, we can create a “Filter”, which in Ambassador will be the representation of the authentication service:
# Create filter
cat <<EOF | kubectl -n ambassador apply -f -
apiVersion: getambassador.io/v2
kind: Filter
metadata:
  name: azure-ad
spec:
  OAuth2:
    authorizationURL: <a href="https://login.microsoftonline.com/https://login.microsoftonline.com/<your_tenant_id>/v2.0
    clientID: <your_app_client_id>
    secret: <your_app_secret>
    - origin: https://cranky-yalow-7215.edgestack.me
EOF
Now Ambassador knows how to reach AAD via the filter, we need to tell it when. That is called a “filter policy”:
# Create filter policy
cat <<EOF | kubectl -n ambassador apply -f -
apiVersion: getambassador.io/v2
kind: FilterPolicy
metadata:
  name: azure-policy
spec:
  rules:
    - host: "*"
      path: "/web/*"
      filters:
        - name: azure-ad
EOF
What we are doing here is saying: for every host, if the path starts with /web/, make sure it is authenticated and if it is not, send it to our azure-ad filter. And we are done! If you refresh the page (again, in my case https://cranky-yalow-7215.edgestack.me/web/), now it should ask you to authenticate, and provided you have valid credentials in the Azure tenant, you should see something like this:
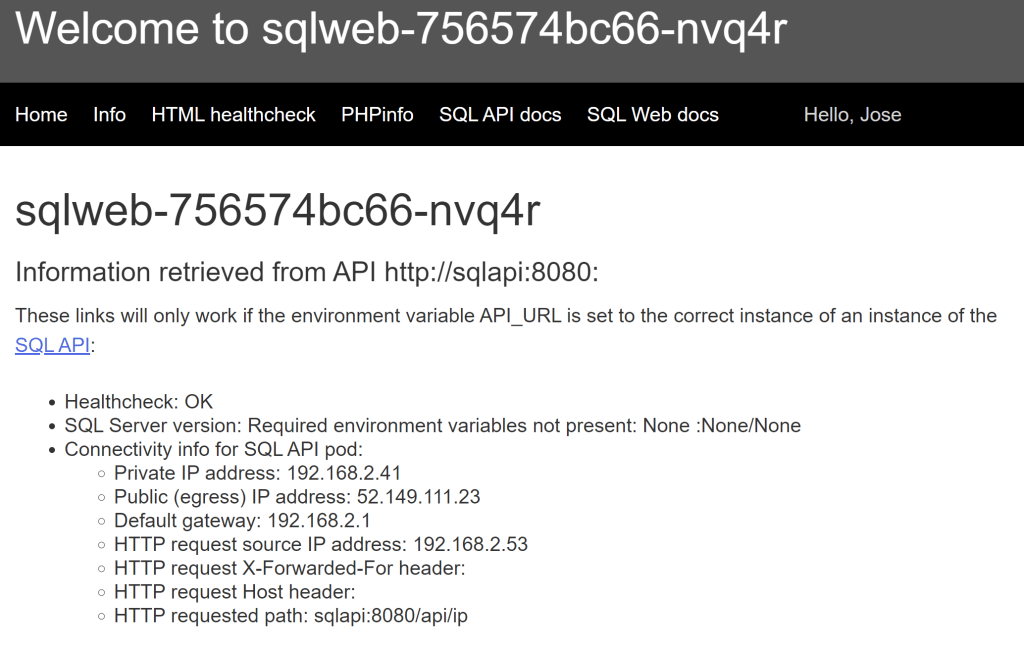
Note the “Hello, Jose” string that the web page extracted from the Bearer Token inserted by Ambassador. For completeness, here is the PHP code that extracts the information out of the Bearer Token, your programming language will vary to hopefully this illustrates how easy it is (bearer tokens are not encrypted):
<li style="color:LightGray;"><?php
    $jwt = $_SERVER['HTTP_AUTHORIZATION'];
    if (empty($jwt)) {
        print ("Not authenticated");
    } else {
        list($header, $payload, $signature) = explode(".", $jwt);
        $plainPayload = base64_decode($payload);
        $jsonPayload = json_decode($plainPayload, true);
        print("Hello, ".$jsonPayload["given_name"]);
    }
?></li>
If you want to see the whole authentication token you can use the PHPinfo page linked from the home page:
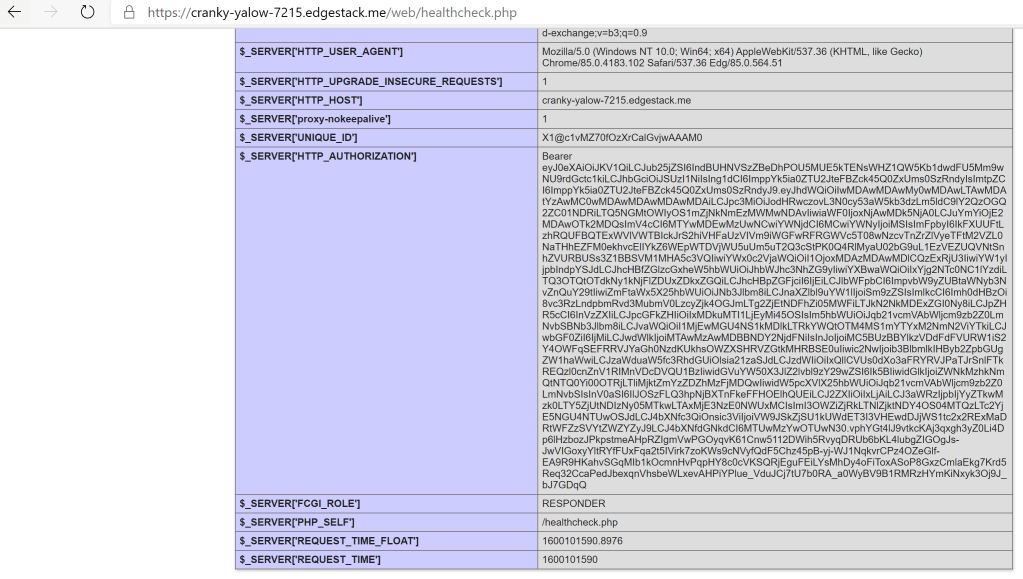
You can copy paste that token and insert it in JWT token analysis sites such as https://jwt.io/ if you want to see what is inside.
So as you can see it is not as easy as Easy Auth with Azure Application Services, but it is not out of this world either. Now you don’t have any excuse for not having authentication on your application running Kubernetes!
Hopefully this was useful, thanks for reading!

[…] proxies is acting as an authentication proxy. For example, I wrote some time ago about how to use Ambassador as authentication proxy for web workloads running on AKS. Why is this important? Well, your application might not (properly) implement authentication, and […]
LikeLike