
You might have heard of the new AKS Gateway API, which will allow for much more functionality than the good, old ingress API that we all know and love. One of those features is the support for TCP routes, since although HTTP(S) is the king protocol in today’s world, there are still many applications out there that work on TCP. Think AMQP, SQL or FTP, to name the first ones that come to mind.
But did you know that even before the Gateway API was there, you could already use TCP routes in Istio gateways? The Envoy proxy, on which Istio is based, does support TCP proxy functionality, and so does the Istio CRDs. The Istio folks are working on getting support for the new Gateway API semantics (see Istio / TCP Traffic Shifting), but you can certainly use the “old” way of doing this with Istio CRDs. You will only need to know two of those: “Gateway” and “VirtualService”.
Creating the cluster
But I am getting ahead of myself. First things first, let’s create a simple AKS cluster. I would recommend you to use either the kubenet or Azure CNI options (in the example below I use kubenet). I haven’t been able to make this work with Cilium, and I suspect that the more sophisticated network implementation of Cilium might not play well with the Istio moving parts (the following commands are bash/zsh, not Windows):
rg=istiotest
location=eastus2
aks_name=istiotest
vnet_name=aksVnet
vnet_prefix=10.13.0.0/16
aks_subnet_name=istiotest
aks_subnet_prefix=10.13.76.0/24
vm_size=Standard_B2ms
az group create -n $rg -l $location -o none
az network vnet create -g $rg -n $vnet_name --address-prefix $vnet_prefix --subnet-name $aks_subnet_name --subnet-prefix $aks_subnet_prefix -o none
aks_subnet_id=$(az network vnet subnet show -n $aks_subnet_name --vnet-name $vnet_name -g $rg --query id -o tsv)
az aks create -g $rg -n $aks_name -l $location -c 1 -s $vm_size --network-plugin kubenet --vnet-subnet-id $aks_subnet_id -o none
You will love this: in order to install Istio you don’t need to deploy any helm charts, but just to enable an add-on in your AKS cluster, see here for more information: Istio-based service mesh add-on for AKS (preview). However, since this AKS functionality is in preview, first you need to explicitly enable this feature. Let me introduce you to a fancy little wrapper bash function that I often use to enable Azure preview features. You are welcome. If you don’t like it, you can always enable preview features the old way using the portal Set up preview features in Azure subscription:
function enableAksFeature () {
    feature_name=$1
    state=$(az feature list -o table --query "[?contains(name, 'microsoft.containerservice/$feature_name')].properties.state" -o tsv)
    if [[ "$state" == "Registered" ]]
    then
        echo "$feature_name is already registered"
    else
        echo "Registering feature $feature_name..."
        az feature register --name "$feature_name" --namespace microsoft.containerservice -o none --only-show-errors
        state=$(az feature list --query "[?contains(name, 'microsoft.containerservice/$feature_name')].properties.state" -o tsv)
        echo "Waiting for feature $feature_name to finish registering..."
        wait_interval=15
        until [[ "$state" == "Registered" ]]
        do
            sleep $wait_interval
            state=$(az feature list --query "[?contains(name, 'microsoft.containerservice/$feature_name')].properties.state" -o tsv)
            echo "Current registration status for feature $feature_name is $state"
        done
        echo "Registering resource provider Microsoft.ContainerService now..."
        az provider register --namespace Microsoft.ContainerService -o none --only-show-errors
    fi
}
enableAksFeature "AzureServiceMeshPreview"
Installing Istio into our cluster will now be very easy, using the new az aks mesh commands. First you need to enable Istio. Second, you enable the ingress gateway component. Third, there is no third step (this joke never gets old, or does it?). You can have external or internal gateways, we will use an external gateway with a public IP address. Now might be a good time to go and refill your coffee mug, these commands may take a while:
az aks get-credentials -n $aks_name -g $rg --overwrite
az aks mesh enable -n $aks_name -g $rg -o none
az aks mesh enable-ingress-gateway -n $aks_name -g $rg --ingress-gateway-type external -o none
Many things happened in the background. The one I would like to bring your attention to is a new namespace called aks-istio-ingress, and the LoadBalancer service with a public IP that will be the entry point to our cluster:
❯ k get svc -n aks-istio-ingress
NAME                                TYPE           CLUSTER-IP    EXTERNAL-IP   PORT(S)                                      AGE
aks-istio-ingressgateway-external   LoadBalancer   10.0.55.192   20.94.1.52    15021:32275/TCP,80:30763/TCP,443:32154/TCP   13m
Deploying the workload
Let’s deploy our application. For this demo we will use a simple echo TCP server (check the docs in istio/tcp-echo-server – Docker Image | Docker Hub). This is a very rudimentary server that will return whatever you send it, prefixed by a string (“hello” in this example). Usually you would create a deployment, but since I want to keep it as short as it gets, I will go with a barebones pod:
kubectl apply -f - <<EOF
apiVersion: v1
kind: Pod
metadata:
  name: tcpecho
  labels:
    app: tcpecho
spec:
  containers:
  - name: tcpecho
    image: istio/tcp-echo-server:1.1
    args: [ "9000", "hello" ]
    ports:
    - containerPort: 9000
---
apiVersion: v1
kind: Service
metadata:
  name: tcpecho
  labels:
    app: tcpecho
spec:
  selector:
    app: tcpecho
  ports:
    - protocol: TCP
      port: 9000
      targetPort: 9000
EOF
We can now verify that both the pod and the service have been created. Note that the service is of type “ClusterIP”, meaning that it is not exposed to the outside world. At this point, only other pods in the cluster have access to it:
❯ kubectl get pod
NAME      READY   STATUS    RESTARTS   AGE
tcpecho   1/1     Running   0          25s
❯ kubectl get svc
NAME         TYPE        CLUSTER-IP    EXTERNAL-IP   PORT(S)    AGE
kubernetes   ClusterIP   10.0.0.1              443/TCP    19m
tcpecho      ClusterIP   10.0.237.53           9000/TCP   2m8s
Configuring the Istio gateway
The Istio resource model required to send traffic through an external gateway to a set of pods consists of a Gateway and a VirtualService resources:
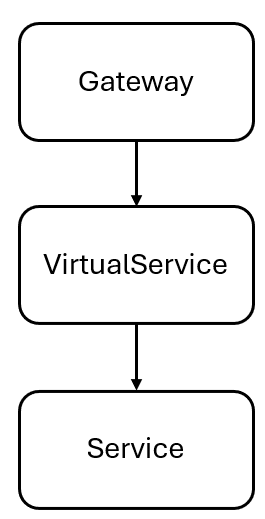
The data plane will look something like this:

First, we need to create a “gateway” object, that will instruct Istio to configure the envoy proxy to listen for TCP port 9000. It is important to use the selector matching exactly aks-istio-ingressgateway-external, so that the port is opened in the gateway deployed by the az aks mesh commands:
kubectl apply -f - <<EOF
apiVersion: networking.istio.io/v1alpha3
kind: Gateway
metadata:
  name: tcpecho-gw
spec:
  selector:
    istio: aks-istio-ingressgateway-external
  servers:
  - port:
      number: 9000
      name: tcpecho
      protocol: TCP
    hosts:
    - "*"
EOF
We can verify now the gateway object. You can use the long name “gateway” or the short version “gw”. You can describe it too, but the information there is not going to blow your mind away:
❯ kubectl get gw
NAME         AGE
tcpecho-gw   3s

❯ kubectl describe gw
Name:         tcpecho-gw
Namespace:    default
Labels:
Annotations:
API Version:  networking.istio.io/v1beta1
Kind:         Gateway
Metadata:
  Creation Timestamp:  2023-10-29T16:47:30Z
  Generation:          1
  Managed Fields:
    API Version:  networking.istio.io/v1alpha3
    Fields Type:  FieldsV1
    fieldsV1:
      f:metadata:
        f:annotations:
          .:
          f:kubectl.kubernetes.io/last-applied-configuration:
      f:spec:
        .:
        f:selector:
          .:
          f:istio:
        f:servers:
    Manager:         kubectl-client-side-apply
    Operation:       Update
    Time:            2023-10-29T16:47:30Z
  Resource Version:  11099
  UID:               37480c26-0072-4606-ae23-43f0bdbd6f9c
Spec:
  Selector:
    Istio:  aks-istio-ingressgateway-external
  Servers:
    Hosts:
      *
    Port:
      Name:      tcpecho
      Number:    9000
      Protocol:  TCP
Events:
We are almost done. Now we need to create a VirtualService, that will instruct the envoy proxy what should be the backend for connections on TCP port 9000. I am using here port 9000 everywhere for simplicity, but you could be using different ports in the pod, in the service and in the VirtualService/Gateway. The ports in the VirtualService and the Gateway must match:
kubectl apply -f - <<EOF
apiVersion: networking.istio.io/v1alpha3
kind: VirtualService
metadata:
  name: tcpecho-vs
spec:
  hosts:
  - "*"
  gateways:
  - tcpecho-gw
  tcp:
  - match:
    - port: 9000
    route:
    - destination:
        host: tcpecho
        port:
          number: 9000
EOF
Let’s “like and subscribe”, I mean “get and describe”:
❯ kubectl get virtualservice
NAME         GATEWAYS         HOSTS   AGE
tcpecho-vs   ["tcpecho-gw"]   ["*"]   14s

❯ k describe virtualservice
Name:         tcpecho-vs
Namespace:    default
Labels:
Annotations:
API Version:  networking.istio.io/v1beta1
Kind:         VirtualService
Metadata:
  Creation Timestamp:  2023-10-29T16:48:31Z
  Generation:          1
  Managed Fields:
    API Version:  networking.istio.io/v1alpha3
    Fields Type:  FieldsV1
    fieldsV1:
      f:metadata:
        f:annotations:
          .:
          f:kubectl.kubernetes.io/last-applied-configuration:
      f:spec:
        .:
        f:gateways:
        f:hosts:
        f:tcp:
    Manager:         kubectl-client-side-apply
    Operation:       Update
    Time:            2023-10-29T16:48:31Z
  Resource Version:  11564
  UID:               dae30fe4-c60c-40a8-9b03-c642f37f1105
Spec:
  Gateways:
    tcpecho-gw
  Hosts:
    *
  Tcp:
    Match:
      Port:  9000
    Route:
      Destination:
        Host:  tcpecho
        Port:
          Number:  9000
Events:
Fixing the problem
In theory, it all should be working by now. However, if you check the open ports for the LoadBalancer-type service of the ingress gateway, you will see that the TCP port 9000 is not there! Consequently, Kubernetes will not know where to send packets to TCP port 9000, or even worse, Azure doesn’t know that it has to open the Network Security Group protecting the AKS nodes for TCP port 9000 inbound:
❯ k get svc -n aks-istio-ingress
NAME                                TYPE           CLUSTER-IP    EXTERNAL-IP   PORT(S)                                      AGE
aks-istio-ingressgateway-external   LoadBalancer   10.0.55.192   20.94.1.52    15021:32275/TCP,80:30763/TCP,443:32154/TCP   16m
Luckily, there is an easy fix for this: you can manually add port 9000 to the service. There are many ways to do this, my favorite is using the superpower kubectl edit (alternatively you can kubectl get -o yaml to a file, modify with your favorite text editor, and apply again with kubectl apply -f):
❯ kubectl edit svc/aks-istio-ingressgateway-external -n aks-istio-ingress
You need to add a new port to spec.ports, and watch out indentation! You don’t need to specify the nodePort, it will be allocated dynamically. In the following excerpt I put the lines I added in bold font:
ports:
  - name: status-port
    nodePort: 32275
    port: 15021
    protocol: TCP
    targetPort: 15021
  - name: http2
    nodePort: 30763
    port: 80
    protocol: TCP
    targetPort: 80
  - name: https
    nodePort: 32154
    port: 443
    protocol: TCP
    targetPort: 443
  - name: tcpecho
    port: 9000
    protocol: TCP
    targetPort: 9000
If we show the service again, now our TCP port 9000 should be right there:
❯ k get svc -n aks-istio-ingress
NAME                                TYPE           CLUSTER-IP    EXTERNAL-IP   PORT(S)                                                     AGE
aks-istio-ingressgateway-external   LoadBalancer   10.0.55.192   20.94.1.52    15021:32275/TCP,80:30763/TCP,443:32154/TCP,9000:30601/TCP   20m
Now we should have all the pieces of the puzzle. You should be able to connect to the public IP on TCP port 9000, and type something. For example, this is what I see (in blue what I type, normal font what I get out of the console):
❯ telnet 20.94.1.52 9000
Trying 20.94.1.52...
Connected to 20.94.1.52.
Escape character is '^]'.
jose
hello jose
That’s all!
And there you have it! We deployed Istio in no time to an AKS cluster, and configured the equivalent of an ingress rule but for TCP, using Istio native primitives of “Gateways” and “VirtualServices”. Thanks for reading!
